A few months ago, I signed up for an account with Amazon Web Services to take advantage of the first year free usage on EC2.
It was a great learning experience as I get to configure everything in detail.
With shared hosting, someone else does the setup and maintenance for you. You can configure a few things in detail but you can’t have full control. It’s like public transport, you cannot change the parts in the vehicle, but you can choose where you want to sit, but you have to share the ride with a lot of strangers.
And it sucks if you have to share it with a serial fartist. i.e. Some silly person who took down the whole server with poorly written codes that take up lots of CPU, or whose website is the target of a DDOS attack and all other websites on the same server got brought down with it.
There’s also co-location and dedicated hosting but those are not affordable to the average web developer.
Then comes the age of cloud computing.
You get full control of a server at the cost slightly higher than shared hosting. You have dedicated CPU and RAM resources so no other server on the same physical machine as you can affect you. (Though I’m not sure what happens if those servers get DDOSed).
Long story short, my shared hosting account with DreamHost was expiring and so I migrated my remaining sites to my AWS micro instance server and here’s the things that happened and what you need to do if you want to run multiple websites on a micro instance as well.
At first, I did not configure my Apache and MySQL installations to work on low RAM machines (micro instances get only 613MB of RAM). They came with the default configuration settings that are meant for dedicated machines that have higher amounts of RAM.
A micro instance does not have a swap file configured. You have to do it yourself and here’s a simple guide:
Switch to root and follow these steps to add the swap space –
Type the following command with count being equal to the desired block size:
dd if=/dev/zero of=/swapfile bs=1M count=1024Setup the swap file with the command:
mkswap /swapfileTo enable the swap file immediately but not automatically at boot time:
swapon /swapfileTo enable it at the boot time, add the following entry into /etc/fstab:
/swapfile swap swap defaults 0 0
Source: Adding swap space to Amazon EC2 Linux Micro Instance to Increase the Performance
Next, edit your apache config file and look for the Server-Pool Size Regulation section.
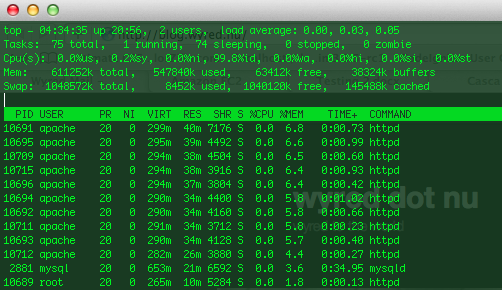
Most likely you are using the prefork MPM. Reduce the MaxClients to about 10. This varies depending on how much RAM each process takes. From my observations, my httpd processes take up about 40M of RAM at most. So I use 10, which allows me to have 10 running httpd proccesses all taking up 400M of RAM.
 It would also be a good idea to reduce the MaxRequestsPerChild to something around 1000 in case of memory leaks. Situations where a process takes up more than 40M of RAM and keeps growing.
Without the above. My apache kept spawning child processes so much that it used up all available RAM and my MySQL process got killed off frequently. That means all my sites that are database driven are immediately crippled.
On a related note, back when I was a child, I loved how I could change parts on those Tamiya cars which gave me the illusion that it would run faster. Looks like my fetish for performance tuning is still there.

